 |
| This is the bathroom before I started
One benefit of this room is it has no window, but does have an extractor fan. I found that making the door light proof was the biggest challenge. I hung a curtain rail and curtain on the inside of the door but still found there were some light leaks. I used some draught sealing foam around the door and that improved things. I purchased some darkroom equipment of eBay (trays etc) which included a blackout curtain so when I use the darkroom I hang that on the outside of the door too. I'm pretty sure its lightproof now.

The darkroom almost complete
I used a piece of kitchen worktop to make the work surface, supported against the wall on two sides and a single leg on the right front of the worktop. The work top is 60" long, which is only just long enough for the enlarger and 3 trays. Based on advice I received I also put up some black paper around the enlarger to reduced light reflected from the negative carrier.
Final completed darkroom
In use the darkroom is only just big enough really, any smaller would be quite difficult to use. The wash basin is a bathroom style and not really big enough. I home made a print washer using a 'Tupperware' style plastic box and a rubber shower attachment with the shower head cut off.
So far I have used the darkroom only a couple of times. The process of producing prints is quite complex but then end results are very pleasing. It takes me quite a while to get the exposure timing right, having to produce 2 or 3 test strips to find the right exposure. I find different films need very different exposures so I take notes as I try things so I can refer back to them later.

Scan of my first successful print (after several attempts!)
If you are thinking of building a darkroom you can find all the equipment you need at very low prices on eBay.
|
Saturday 24 May 2014
Building a Darkroom
Tuesday 4 February 2014
1937 Leica III
My 1937 Leica has been on the shelf for too long, fitted with the F2 Summar its a beautiful instrument.
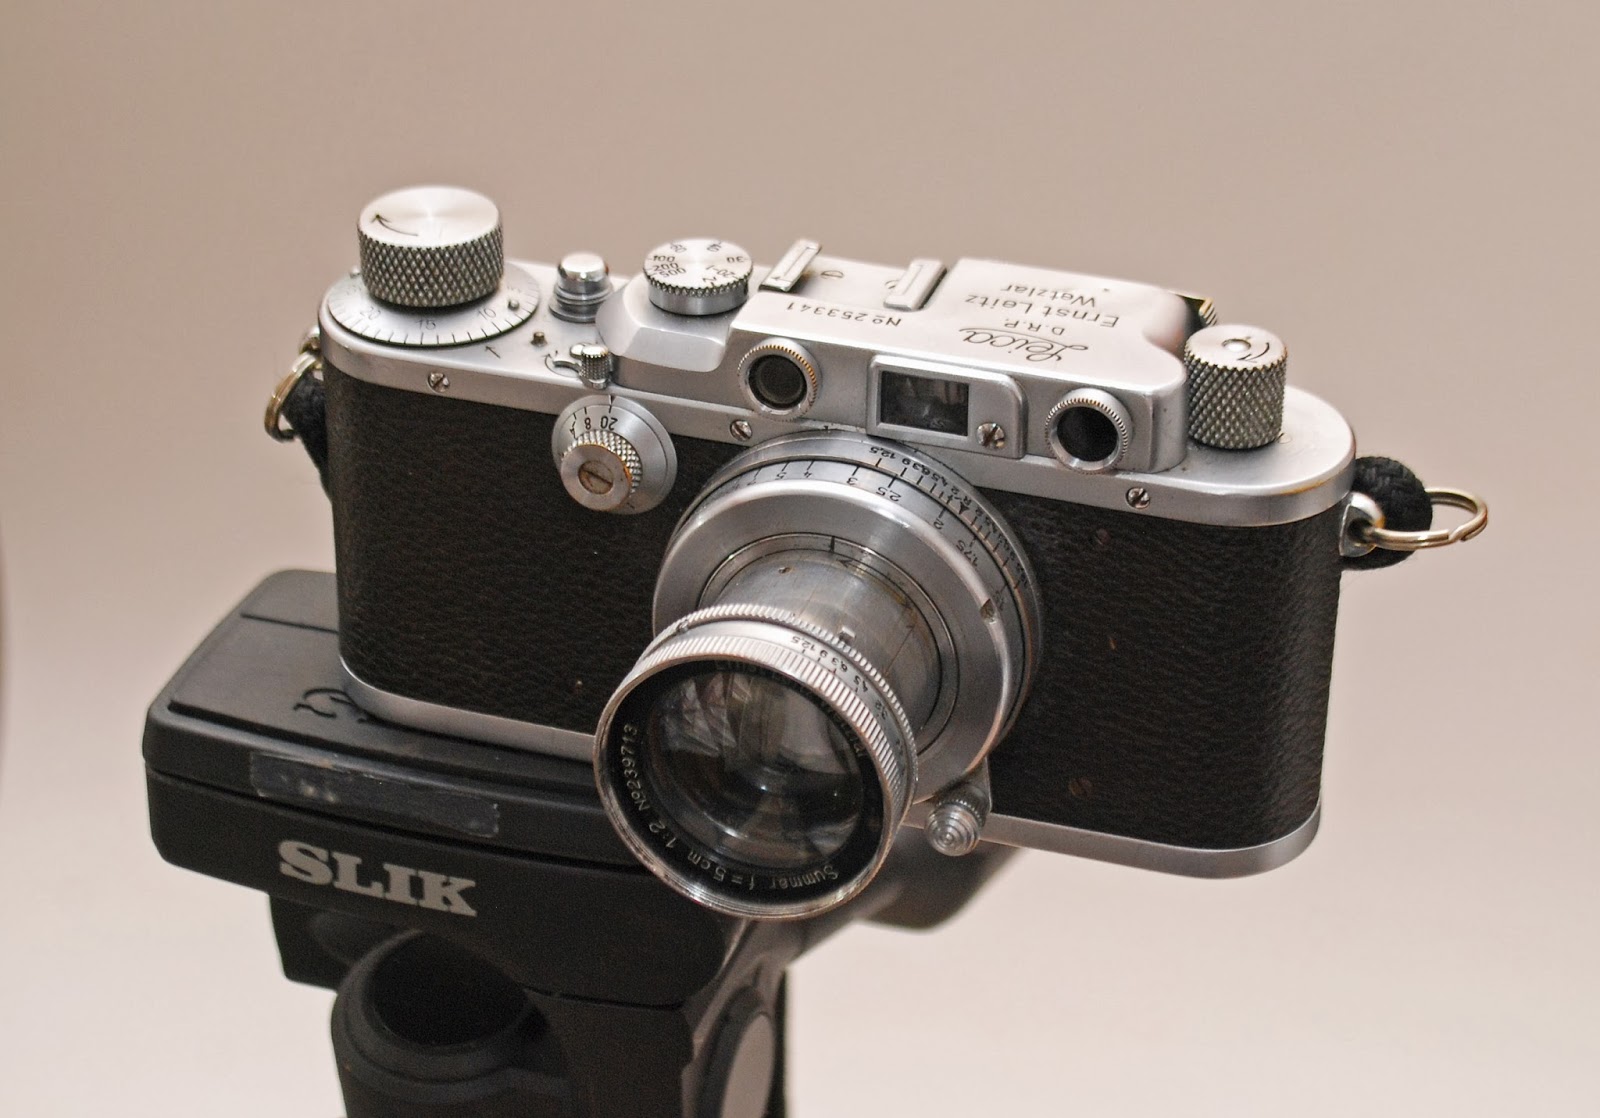
However my first attempt at using it ended in failure. It is fiddly to load a film in the camera and I ended up with the film not winding on properly and a small piece of torn film lodged in the mechanism. This can be awkward as unlike SLR cameras you can't get to the back of the focal plane shutter. However by removing the lens and setting the shutter on 'B' I was able to get the film piece out with tweezers. The instructions for loading the film are printed on the underside of the base plate:

You need to cut the film leader as shown and then slot the film and the removable spool back into the camera. This shot shows the film and spool being inserted back into the camera:

The Summar lens is really sharp, as this test show shows:

However my first attempt at using it ended in failure. It is fiddly to load a film in the camera and I ended up with the film not winding on properly and a small piece of torn film lodged in the mechanism. This can be awkward as unlike SLR cameras you can't get to the back of the focal plane shutter. However by removing the lens and setting the shutter on 'B' I was able to get the film piece out with tweezers. The instructions for loading the film are printed on the underside of the base plate:
You need to cut the film leader as shown and then slot the film and the removable spool back into the camera. This shot shows the film and spool being inserted back into the camera:
I'm off the Turkey next week, and I will be taking some shots with the Leica.
Thursday 29 August 2013
Retro 80s
Off on holiday to Europe I loaded up my trusty Nikon F with a roll of Retro 80s film. I was hoping to capture some crispy contrasty landscapes and dramatic skys and this film has a good reputation for contrast. I'm not sure who makes this film, its often called Rollei Retro, but the film canister says its made by Agfa. I purchased a couple of rolls from Silverprint (here). On my return I processed the roll in Rodinal, 14mins, 10sec agitation every minute. Here are some of the results, most of them taken with a Nikkor 24mm F2.8 lens:


I'm very happy with the clouds on this shot, but a common problem with this film is shadow detail and the detail on the shady side of the hill is a little poor.

Another shot with the sort of clouds I was hoping to capture.

This is probably my favourite. It has a really nice quality about it almost like a painting. Finally this photo, taken in bright sunlight and a cloudless sky shows the films contrast off well:

I will definitely use this film again, I love its contrast and the way it brings out clouds. Best results were in bright sunlight, with shadow detail poor. I may well try stand development next time.
Friday 10 May 2013
Filters for clouds
I've always been a bit disappointed with the sky on my black and white landscape photos. I want the clouds to stand out but often they are almost invisible. To try and remedy this problem I thought I would try and photograph the same sky with different filters so see if they made much difference. I loaded up my Nikon F with Fuji Neopan and gave it a go. First with no filter at all, then a yellow filter and finally a red 25A filter. The 25A is really quite dark and takes about 3 stops off the exposure.

The photo on the left is with no filter, in the middle is with the yellow filter and on the right with the red 25A. The difference between them is quite subtle, with the clouds getting a little more defined and the contrast increasing slightly. I don't think there is much difference between the yellow and the red filter. Certainly the loss of 3 stops isn't really worth it!
I took the Nikon out to Canary Wharf in London recently and tried some building shots with the yellow filter. At the start of the outing there was a good amount of sunshine with some cloud. This is one of the first photos I took that day. I quite pleased with the cloud contrast.

Later in the day the cloud cover increased and it wasn't possible to get the type of sky/could photos I was after
Having done some research I am planning to try out some Rollei Retro 80 film. I believe that might give the high contrast super sharp look I am after.
Sunday 28 April 2013
Olympus OM-1
I got my OM-1 a while back on e-bay. I had lusted after these revolutionary cameras since I was at university 30 years ago. At that time they were way outside my budget, now of course they can be picked up quite cheaply. I ran a couple of films though it with good results but the on/off switch was damaged and before long it broke off completely. Recently I decided to get the OM-1 fixed and thanks to a recommendation from the Facebook OM group I found a guy in the UK who does quality camera repairs cheaply. This is the guy: www.cam-rep.co.uk
The camera came back with new light seals and a new on/off switch and seems to work fine.


The camera came back with new light seals and a new on/off switch and seems to work fine.

This is a 'self portrait' taken in a mirror from the test film I put through the camera when I got it back. The repair guy suggested that I set the meter 1 stop faster than the film (400ASA for 200ASA film) as he tested the meter and found it was a bit weak.
The question that arises with OM-1 cameras is what battery to use. The original mercury cells are no longer available. I have been using hearing aid batteries (1.4volt 675ZA - you can get theses in Boots the chemist in the UK). However these batteries don't last very long. I though I would try so called Wein cells. These can be purchased in the UK from the Small Battery Company (www.smallbattery.company.org.uk/) but are quite a bit more expensive that the 675 hearing aid batteries (£5.20 ea) but are supposed to last a lot longer.

I'm still not convinced the meter is really accurate so as soon as I have some time I'm going to do a proper series of test shots to calibrate the meter properly
Wednesday 20 March 2013
More tests with Spursinn
One of the claimed advantages of the Spursinn HCD two bath developer is its ability to push films to high EV levels. So I thought I would try this out and loaded a small length of Fuji Neopan 400 from my bulk roll (actually its Legacy Pro 400 but apparently its really rebranded Fuji). I tried it out at EI 12,800 - pushed 5 stops. I used my Olympus OM1 and manually checked the exposure using my old Weston Mast V light meter (The OM-1 meter only goes to 1600 and its broken anyway)
The literature that comes with HCD gives a development time of 3 mins (as always) in HCD-S and 24 mins in HCD-2.
Results? Not very good, the negatives are very thin and underexposed. I'm not sure if my meter works well at this high EI value. Maybe not.
 These two are the only ones I could scan, and even then, they have quite a lot of work in Photoshop.

The literature that comes with HCD gives a development time of 3 mins (as always) in HCD-S and 24 mins in HCD-2.
Results? Not very good, the negatives are very thin and underexposed. I'm not sure if my meter works well at this high EI value. Maybe not.


This one is a banana, in case you are wondering. If my meter does not work well at these speeds, I'm not sure I can get the advantage of pushing the films, although the results are not as grainy as you might imagine.
Friday 15 February 2013
Polaroid Land Camera 330
I got this lovely old folding Polaroid on e-bay for just £6! The seller listed it incorrectly as a Kodak camera which may explain how I got it so cheap. The 330 model has a glass rather than plastic lens (that the 320 and lower numbers have). Its in pretty good condition considering its age.


First task was to see if the 'electronic eye' which adjusts the shutter speed works. To do this a battery is needed.

The camera originally took a 3v battery which are not longer widely available. Luckily I had an AAA battery holder handy which takes two AAA cells to give 3 volts. I wired this up temporarily to check if the shutter works. In the dark the shutter can be heard closing a few seconds after the button is pressed showing that a longer exposure would have been made.
The Fuji FP-3000 film arrived (also from e-bay) and, with the battery still not properly fixed I tried it out. I went for an indoor mirror self portrait. The first photo was pretty dark so I tuned up the setting to lighter and tried again. This time the shot was still a little dark but quite sharp:

The pack film produces a kinda negative along with the print, I quite liked the effect of that so I scanned that part too:

Not bad for a first attempt. Next I must fix the battery properly.
Subscribe to:
Posts (Atom)